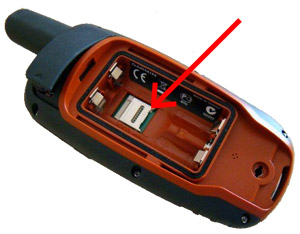
Installing the Micro-SD Card
Installation of the Micro-SD card is pretty straightforward. While the location
and appearance of where it goes may differ slightly between various models of
Garmin®, the process is very similar:
 |
1 |
Place the Micro-SD card in the
compartment, usually found under the batteries. If applicable on your
model, be sure to secure the latch to keep the card in place.
|

|
 |
2 |
The setup proces may be
different depending on the model and age of the GPS device, but in
principle, it should follow along these lines:
• From the Home screen,
select:
Setup > Map > Map Select > NZTopo4GPSxxxx > Enable.
|
 |
3 |
Depending on the model and
age of your GPS, it may be beneficial to disable the World Basemap that
the GPS runs in the background and any marine charts.
NB: Some units, in particular ones that can download mapping such as
the 67i, will likely need additional layers turned off to avoid them preventing
the display of Topo4GPS. Your device's menu (as well as your installed maps and resulting map
hierarchy) may differ, but from the main menu typically you should be looking for:
Map Manager - Ensure Topo4GPS is turned on, then press 'Quit'.
Map > (press 'Menu') > Map Layers. Turn off other maps such as Satellite or
TopoActive. Leave CityNavigator on.
|
Note that the Micro-SD Card version can also be viewed in BaseCamp™
using a card reader or by connecting your GPS to your computer.
• Connect a GPS device or an SD card reader to your computer (for more information, see the owner's manual for your device).
The name of the device or the SD card appears in the Library and Devices area.
• Select Maps, and then select NZTopo4GPSxxxx.
NB: As Apple computers write additional files to cards that will affect your GPS's ability to read the mapping, we do not recommend connecting to a Mac via use of a card reader.

|